


 Hi Folks Louise here,
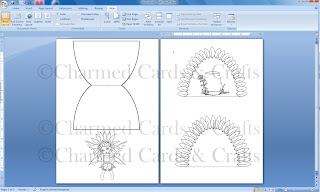
1. Open Microsoft Word and insert the Card template, Layer 1, layer 2, the Daisy image shown above and the plant pot. The kit includes the ready coloured images and the black and white images so if you're in a hurry you can print them out ready coloured!
Once on the screen you can move them around and resize them as desired. Try dragging the images over eachother to check they will fit together how you want them to. Here you'll see that I've put the flower pot in position on layer 2 to save me from cutting and sticking later on. If you have trouble moving an image around in a Word document; right click on the image, click text wrapping then click in front of text, you should now be able to drag the image freely around the page. To resize the image either right click and alter the size by cms on the size screen or just click on the image and drag from the corner. NEVER RESIZE BY DRAGGING FROM THE SIDES, TOP OR BOTTOM this will distort the image.
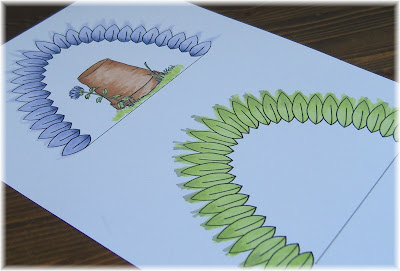
2. When you're satisfied with the size of your card elements print them out onto your chosen cardstock. Time to colour! Here's a really big tip; You're going to be cutting them out so feel free to use big strokes of the pen from the inside of the of the petal outwards. It doesn't matter if you go over the outer edge, in fact it's better if you do because you'll get a smoother finish. It's so much quicker too! I used Copic Markers to colour mine.

3. Cut them out! It's acutually quicker than you might think. The quickest way to cut out the to petal layers is to first cut right around the outer edge (next to the petal tips) then snip out the tringles between each petal.
 4. Fold your card base then simply put it all together! I sat my Pixie onto the card with foam pads for a 3D effect but I actually glued her bottom to the card (ouch!) to make it look like she was really sitting on the pot.
 Here you can see that I've curled the edges of the petals over on the top layer to add dimension.
If you make one of these cards I would love to see the results so please leave a comment here and I'll visit your blog for a peek.
To purchase the Pixie Chick Downoad collections which include the card kits annd lots lots more just click here.
Enjoy your day
Louise xx


9 comments:
thank you so much for the step my step i shall be giving a go at the weekend.
xxx
Oh my goodness Lou, this collection is amazing...but you know what a ditherer I am! I was in turmoil trying to decide which image to play with first!
Stunning!
love Dingle.x
Great tut Lou.. I'm having the same trouble as Adele so much to choose from where do I go first..:).
Sheila xx
Thanks so much for this tut, I so need it and pretty sure I can follow your well defined step by step.
Hugs,
Nicola -x-
Beautiful images and excellent instructions! Well done!! Ruth xx
thank you for the step by step...I can't wait to play!
I played today not with the Tut Lou but I created this one..
Here's my card
I'm so in love with these Pixies thank you thank you thank you
Hugs
Sheila x
Thank you so much Lou, that tutorial has really inspired me to have a proper play with your fab new collections hopefully on Sunday!
Lea
♥
Great Tutorial have had a little play today and have posted on blog was going to enter it into the challenge no designer paper till just realised that was for last week Duh!!!!!!!!
Love the Pixies.
Beccy x
Post a Comment