Showing posts with label Pixie Chicks. Show all posts

Wednesday, 13 October 2010

FREE Download - Perfectly Defined # 3

Hi gang, Karen here. Ooohh, that week whizzed by! I hope the seven days since my last post have been FAB for you all!! Are you enjoying the Perfectly Defined freebies we are bringing you? This weeks definition was inspired by our Gunn's fabby post on Sunday.


The bundle comprises five different versions and I think this one is super for all paper crafts. It is superb for scrapping all your Halloween pictures and as you can see it is super for cards to. I used Dreamer from the Pixie collection, also available in a Delectable clear stamp, with the main Spooky definition.


To get this spooky bundle FOR FREE just email through a request HERE and we shall email through a download link to the bundle.


Psstt.. check your Euro Millions ticket for last Saturday, the lucky winner of £112 MILLION hasn't got a clue that he/she is one of the richest people in the country! Could it be you? If it is then CONGRATULATIONS and please remember who reminded you to check :-)))

Bye for right now x

Saturday, 4 July 2009

Spot the Difference


I decided to have a another little play around with 'Dreamer' from Bundle one, this time I flipped her Horizontally in Photoshop Elements so that she was laying in the Opposite direction.
You can do this in any photo imaging software programme doesn't have to just be Elements, you can even do this in Word also just right click on your image and then rotate it 180 degrees Sorry peeps you don't rotate it 180 degrees you actually do flip it in word too and Voila she's flipped round..:).
I hope you like what I did with her I think she looks rather nice whichever way she sleeps:).. but then she is my favourite :).
Thanks for taking a look more detail about both of these are on my blog if anyone fancies taking a look.
Hugs
Sheila xx
EDITED after posting.. I have got a short step by step picture tutorial if anyone is interested in how to flip her word... I don't mind posting that on my next day on the blog.. just let me know :)

Sunday, 28 June 2009

Let the Sun Shine!


Hello folks, Louise here,


I have a little sad news to share with you before I give you this week's challenge. Our truly amazing DT member Juliet has decided to step down from the team, it was a difficult decision for her because Dottie's World holds a very special place in her heart but she knows our door is always open for her, she will always be welcomed with open arms. She is a great loss to the team and will be sorely miss. Thank you Juliet for everything you have done for us here at Dottie's World, we all love you to bits.♥♥♥

On with the challenge...

"Summer is finally upon us so I want you to use some sunshine in your card/creation, it could be an actual sunshine image, a card shaped like a sunshine or even the use of the word sun/sunshine somewhere on your creation. Don't forget to put your Charmed download in there somewhere too!"

Take a look at the fabulous inspiration from the team...


Sheila

Gunn

Tara

For a closer look and to find out more about each creation please click on the DT names to visit their blogs.

Enjoy our challenge, you have until next Sunday to play, just leave us a comment here and we'll visit your blog to see what you come up with♥

Louise xx

Saturday, 27 June 2009

Welcome to the magical world of the Pixie Chicks


I just thought I'd share with just how versatile the Pixie Chicks downloads are, I really had fun creating this little scene to give you all a tiny glimpse into the magicial world these adorable little creatures live in.
I took Daisy undercover bundle one & the Riverside background image from bundle two put both images together in Photoshop elements to create just the one image.
I coloured the scene with Copic's & because I wanted to create the effect of you peeking through the undergrowth at this magicial world.. I added a few leafy branches and the birds flying in the background, using some of my scenic stamping stamps I have.... cos I also love to create scenes using many different stamps...lol.
I hope you like your tiny glimpse into this world,I've decided I quite like this so will make a couple more scenes using these adorable Pixie Chicks, for my Grandson to give to his 'girlfriend' for her B'day... by the way they are only 7 years old ( Grandson & his' Girlfriend)..ain't puppy love grand!!..
Sheila xx

Wednesday, 24 June 2009

Daisy Card Tutorial

Hi Folks Louise here,

Today I thought I would show you how easy it is to make a fabulous card using the card kits included in the Pixie Chicks digital download collections. Yesterday I showed you the Water Lilly card made from the elements included in Pixie Chicks Collection 1, well, today I'm showing you how to make the Daisy card using the elements from Pixie Chicks set 2 -the same principle works for both cards.
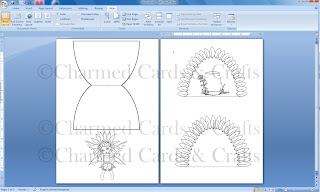
1. Open Microsoft Word and insert the Card template, Layer 1, layer 2, the Daisy image shown above and the plant pot. The kit includes the ready coloured images and the black and white images so if you're in a hurry you can print them out ready coloured!

Once on the screen you can move them around and resize them as desired. Try dragging the images over eachother to check they will fit together how you want them to. Here you'll see that I've put the flower pot in position on layer 2 to save me from cutting and sticking later on. If you have trouble moving an image around in a Word document; right click on the image, click text wrapping then click in front of text, you should now be able to drag the image freely around the page. To resize the image either right click and alter the size by cms on the size screen or just click on the image and drag from the corner. NEVER RESIZE BY DRAGGING FROM THE SIDES, TOP OR BOTTOM this will distort the image.
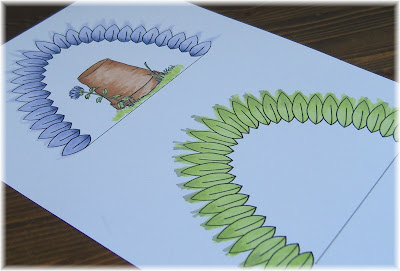

2. When you're satisfied with the size of your card elements print them out onto your chosen cardstock. Time to colour! Here's a really big tip; You're going to be cutting them out so feel free to use big strokes of the pen from the inside of the of the petal outwards. It doesn't matter if you go over the outer edge, in fact it's better if you do because you'll get a smoother finish. It's so much quicker too! I used Copic Markers to colour mine.
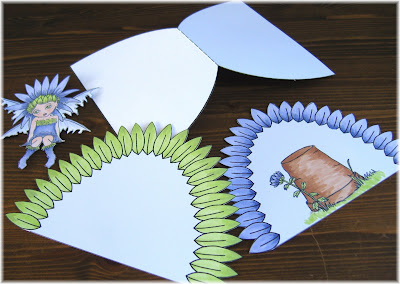
3. Cut them out! It's acutually quicker than you might think. The quickest way to cut out the to petal layers is to first cut right around the outer edge (next to the petal tips) then snip out the tringles between each petal.


4. Fold your card base then simply put it all together! I sat my Pixie onto the card with foam pads for a 3D effect but I actually glued her bottom to the card (ouch!) to make it look like she was really sitting on the pot.

Here you can see that I've curled the edges of the petals over on the top layer to add dimension.

If you make one of these cards I would love to see the results so please leave a comment here and I'll visit your blog for a peek.

To purchase the Pixie Chick Downoad collections which include the card kits annd lots lots more just click here.

Enjoy your day

Louise xx

Tuesday, 23 June 2009

Water Lilly

Good morning folks, Louise here! Isn't it exciting! Two whole new collections to play with! Are you struggling to choose which one to get? Well I don't think I'd be able to choose, I have favourites in both kits. I think my favourite in set one is Water Lilly...but then there's Dreamer......and Daisy....and Holly.......Oh I don't know! Anyhow here is the card that I made using the card kit included in the set...All you have to do is print cut and stick! Even the card base is there ready to print out! If you have more time on your hands and you're feeling more creative print it all out in black and white and choose your own colour scheme, the Pixie chicks are great fun to colour!
I'll be back tomorrow with a mini tutorial for the set 2 card kit.
To see the full collection or to purchase the Pixie Chicks Download images and be playing with them straight away visit this page at Charmed Cards and Crafts.

Monday, 22 June 2009

Pixie Chicks

The two new collections featuring our new adorable PIXIE CHICKS are now ready as digi-stamps. Click the pictures to purchase.


Friday, 12 June 2009

Warning!


Watch out! There's a Fairy teen about the place!! I wonder if they are quite as stroppy as the un-winged kind!? Meet Rosebud Fairy. This little lady has dyed her delicate pink rose petals black, much to her parents disdain.


Rosebud is part of our new Pocket Faires collections, soon to be released:


My daughter didn't care much for the sentiment I chose, it didn't make sense to her (well she's only 12 and the hormones have only just started kicking in), so this morningI had to quickly make something else.


I apologise for the occasional glimpse of a foam pad, it looked alright in real life LOL


There will be more previews coming soon so watch out for those.


Thanks for visiting ♥

Blog Widget by LinkWithin